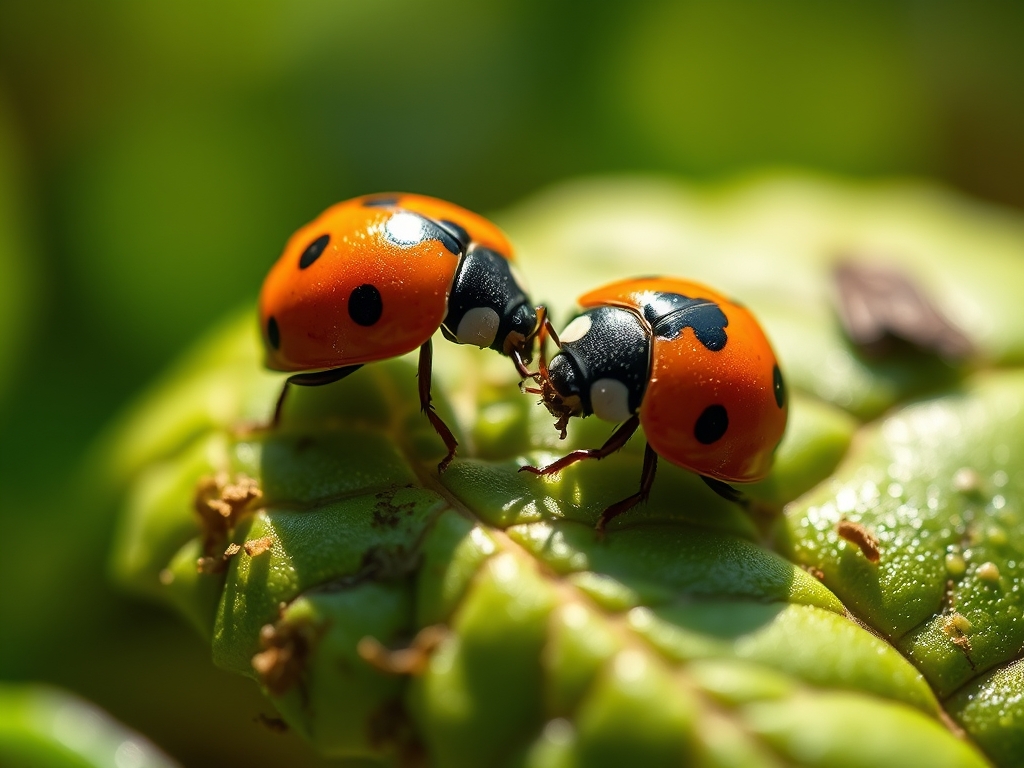
6 Expert Ways How to Release Ladybugs for Houseplants
The smell of damp peat and the crisp turgor of a leaf fully hydrated by osmotic pressure signal a healthy indoor microclimate. Maintaining this balance requires precise biological control. When aphid or mite populations exceed the economic threshold of your indoor collection, knowing how to release ladybugs for houseplants becomes a critical skill in integrated pest management. You must synchronize the release with the biological needs of the Hippodamia convergens to ensure they remain on the foliage rather than migrating toward light sources.
Successful deployment depends on humidity levels and the physiological state of the host plants. Ladybugs are dehydrated upon arrival after cold storage. If you release them into a dry environment with low turgor pressure, they will immediately seek moisture elsewhere, often dying on windowsills. You are managing a living system where the rhizosphere and the canopy must both be prepared to support predatory activity. This process is not a casual addition to your routine; it is a calculated biological intervention designed to reset the equilibrium of your indoor garden.
Materials:

The effectiveness of biological controls is indirectly influenced by the health of the substrate. A plant under nutrient stress emits distress signals that can interfere with predator-prey dynamics. Your houseplants should be established in a **friable loam** with a high **Cation Exchange Capacity (CEC)** to ensure nutrient availability.
For vegetative growth, maintain a soil pH between 6.0 and 7.0. Use a balanced NPK ratio of 10-10-10 for general maintenance, or a nitrogen-heavy 20-10-10 for foliage-heavy species like Ficus lyrata. High nitrogen levels increase succulent growth, which attracts the very pests ladybugs hunt. Ensure your substrate contains perlite or pumice to maintain an oxygen-rich rhizosphere, preventing the anaerobic conditions that lead to root rot. You will also need a fine-mist spray bottle and a source of non-chlorinated water to prepare the leaf surfaces.
Timing:
Timing is dictated by the photoperiod and the internal biological clock of the insects. While houseplants are protected from Hardiness Zone fluctuations (typically kept in environments mimicking Zones 10-12), the ladybugs are sensitive to light. Never release them during the peak of the day. The transition from vegetative to reproductive stages in your plants often brings a flush of new growth that is highly attractive to pests.
The optimal window for release is at dusk or after the grow lights have been deactivated. This exploits the insects' natural tendency to settle when temperatures drop and light intensity decreases. If you release them during the day, their positive phototaxis will drive them toward the nearest window, away from the infested plants. Ensure the ambient temperature is between 65 and 75 degrees Fahrenheit. Temperatures below 55 degrees will induce lethargy, while temperatures above 80 degrees may trigger a flight response.
Phases:

Hydration and Priming
Before opening the container, place it in a refrigerator at 40 degrees Fahrenheit for 30 minutes. This slows their metabolism and prevents a mass exodus upon opening. Mist the foliage of your houseplants lightly with distilled water.
Pro-Tip: Providing surface moisture utilizes the principle of hydrotropism. Ladybugs are often desiccated after shipping; providing immediate access to water ensures they stay on the plant to rehydrate rather than flying in search of a water source.
Strategic Placement
Release the ladybugs in small groups at the base of the plants or in the crotches of the branches. Focus on the undersides of leaves where pests like aphids and scale tend to congregate. Use a rate of roughly 10 to 20 ladybugs per large houseplant.
Pro-Tip: Ladybugs exhibit negative geotaxis, meaning they naturally crawl upward. By placing them at the base of the plant, you ensure they traverse the entire vertical structure of the specimen, maximizing their encounter rate with prey.
Establishing the Colony
Maintain high humidity around the plants for the first 48 hours. Use a humidity tray or a room humidifier to keep levels above 50 percent. Avoid using any residual oils or soaps for at least 7 days prior to release, as these can be toxic to the beetles.
Pro-Tip: High humidity prevents the desiccation of the ladybugs' spiracles. This support of their respiratory system allows them to focus energy on hunting rather than survival, facilitating a faster reduction in pest density.
The Clinic:
Observe your plants for physiological disorders that may be mistaken for pest damage.
- Symptom: Interveinal Chlorosis. Older leaves turn yellow while veins stay green.
- Solution: This indicates a Magnesium deficiency. Apply a solution of 1 teaspoon of Epsom salts per gallon of water.
- Symptom: Leaf Tip Burn. Brown, crispy edges on new growth.
- Solution: Likely caused by salt accumulation in the substrate. Flush the soil with three times the pot's volume in water to lower the electrical conductivity (EC).
- Symptom: Stunted Growth with Purple Undersides.
- Solution: This is a classic Phosphorus deficiency. Check soil temperature; if it is below 60 degrees, phosphorus uptake is inhibited regardless of soil concentration.
- Symptom: Nitrogen Chlorosis. Uniform yellowing of the entire leaf, starting from the bottom.
- Fix-It: Apply a high-nitrogen liquid fertilizer (NPK 30-10-10) at half strength to restore chlorophyll production.
Maintenance:
Precision maintenance ensures the long-term success of your biological controls. Monitor soil moisture using a soil moisture meter; most tropical houseplants require a saturation level that feels like a wrung-out sponge. Provide approximately 1.5 inches of water per week, applied directly to the soil to avoid wetting the crown.
Use a hori-hori knife to check for soil compaction every three months. If the blade does not slide easily into the substrate, the roots may be suffering from a lack of gas exchange. Prune dead or senescing tissue using bypass pruners that have been sterilized with 70 percent isopropyl alcohol. This prevents the spread of fungal pathogens and focuses the plant's energy on active meristems. If ladybugs remain on the plant, avoid any broad-spectrum interventions that could disrupt their lifecycle.
The Yield:
In a houseplant context, the "yield" is the preservation of aesthetic value and the prevention of plant death. A successful ladybug release results in the suppression of the pest population within 7 to 14 days. You will observe "mummies" or empty aphid husks on the leaf surfaces.
Once the pest population is decimated, the ladybugs will naturally disperse or die off due to a lack of food. To maintain "day-one" freshness for ornamental foliage, wipe the leaves with a damp microfiber cloth after the ladybugs have finished their cycle. This removes honeydew residue, which can otherwise lead to the growth of sooty mold.
FAQ:
How many ladybugs do I need for my indoor plants?
For standard indoor settings, release 15 to 25 ladybugs per medium-sized plant. Overcrowding can lead to a rapid depletion of food sources, causing the beetles to disperse into your living space or die prematurely from competition.
Why did my ladybugs fly away immediately?
This usually occurs due to positive phototaxis or low humidity. If released during the day or in a dry room, they fly toward windows. Always release at night onto misted foliage to encourage them to settle and hydrate.
Can I store extra ladybugs for later use?
Yes. Keep them in their original container in a refrigerator at 35 to 45 degrees Fahrenheit. They can remain dormant for several weeks. Mist the container lightly once a week to prevent total desiccation during storage.
Will ladybugs bite my family or pets?
Ladybugs are predatory toward soft-bodied insects and do not seek out humans or pets. While they can produce a defensive chemical that smells slightly acrid, they are harmless to household inhabitants and focus entirely on the plant canopy.